Equirectangular Imaging – Capturing Cube Maps with ESP32 Cam Modules
The last post demonstrated how to stitch images captured with the ESP32 Cam module, https://www.cloudacm.com/?p=4624.
This post will expand on that by using ESP32 Cam modules to capture cube maps. The following image is an example of the previous post stitching process, but it required some adjustments so that all source images were included, here is the command arguments used.
py stitch.py --match_conf .25 --confidence_threshold .45 *.jpg
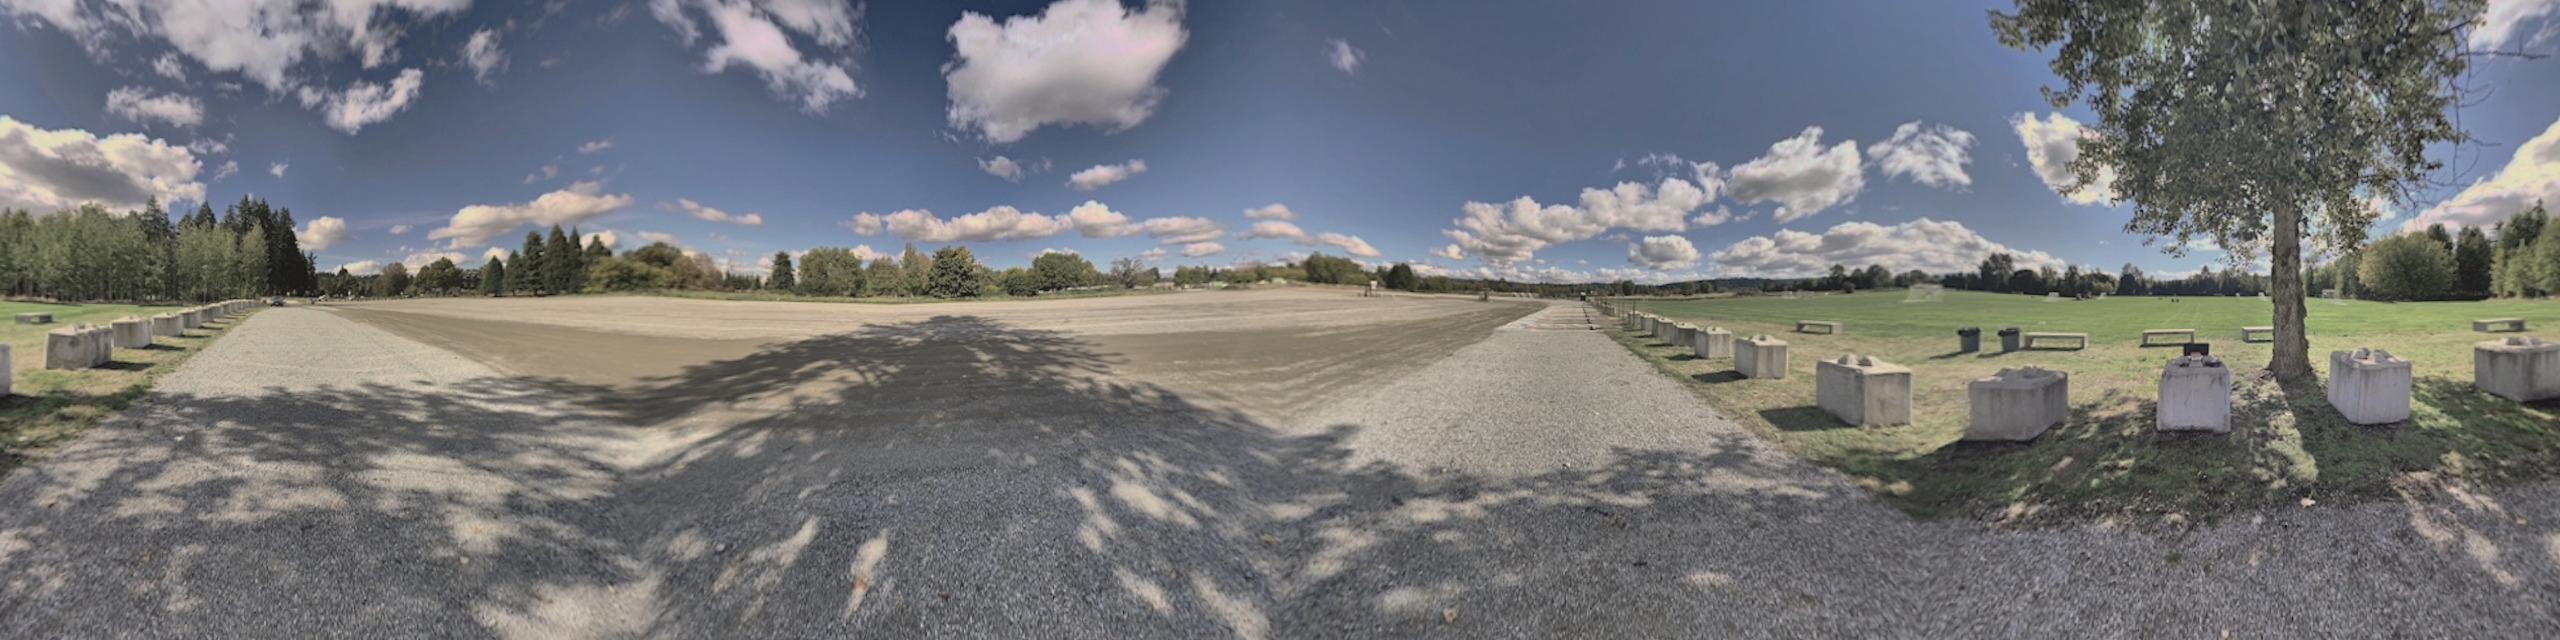
Finding those argument values was time consuming with many trials and errors along the way. The resulting image is a complete 360 degree view across the horizon. The image doesn’t contain anything at the polar axis. That process lacks the function to include images along the vertical axis. Here are some methods that can be used to capture along both axis.
The Google Street View Mobile App offers a way to use a regular mobile phone to capture equirectangular images. Mobile phones typically have a 60 degree field of view, so it requires taking many images that will be stitched together, around 40 in total. This can take time and requires that the camera operator pay attention and step through each captured image.
Simplifying the process with fewer images, 6 points of direction, and leveraging inexpensive hardware were the motivators for using cube mapping instead. Here is a definition of cube mapping provided by Wikipedia, “In computer graphics, cube mapping is a method of environment mapping that uses the six faces of a cube as the map shape.” (1)
Capturing the images is a simple matter of pointing and clicking in these six directions, front, back, left, right, up, and down. Configuring an array of ESP32 Cam modules to work simultaneously is feasible, but that is beyond the scope with this post. Once the images are captured, they will need to be processed for a final tiled cube map or equirectangular image.
Fred Weinhaus offers transform examples available online that convert equirectangular projections to cube map faces (2). The site also provides cube map to equirectagle transforms (3). All are based on imagemagick which is used as the image processing engine.
The native image sensor’s field of view that is included with the ESP32 Cam module is less than 90 degrees. Also, the images captured by the module have a x:y dimension ratio that isn’t square based on the FRAMESIZE definitions. Here are the available frame sizes and their ratios.
The frame size can be set to one of these options:

Ratio 1.22:1
FRAMESIZE_CIF (352 x 288)

Ratio 1.25:1
FRAMESIZE_SXGA (1280 x 1024)

Ratio 1.33:1
FRAMESIZE_QVGA (320 x 240)
FRAMESIZE_VGA (640 x 480)
FRAMESIZE_SVGA (800 x 600)
FRAMESIZE_XGA (1024 x 768)
FRAMESIZE_UXGA (1600 x 1200)
There are wide field of view lenses available for the module. A search online for “OV2640 120 degree” will provide available sensor modules. The reason for a 120 degree lens is because that is the x axis field of view. Applying the mentioned dimensional ratio, the y axis is roughly 90 degrees, which is essential for building cube map faces.
Images captured with the 120 degree sensor will need to be cropped to square dimensions so that the final image has a 90 degree feild of view along the x and y axis. That can be done with this imagemagick command based on an example source image dimension, adjust as needed based on the module’s FRAMESIZE_ setting.
#!/bin/bash
# cloudacm.com
# IM Batch Process - ImageMagick Script authored by Fred Weinhaus
# See site, https://www.fmwconcepts.com/imagemagick/cube2sphericalpano/index.php

# Crop the original 1024 x 768 to a 768 x 768 image, based off of calibration measurements of 768 px = 90 degrees
convert src_L.jpg -crop 768x768+128+0 L.jpg
convert src_F.jpg -crop 768x768+128+0 F.jpg
convert src_R.jpg -crop 768x768+128+0 R.jpg
convert src_B.jpg -crop 768x768+128+0 B.jpg
convert src_U.jpg -crop 768x768+128+0 U.jpg
convert src_D.jpg -crop 768x768+128+0 D.jpg

# Create Equirectangular image from source images
./cube2sphericalpano L.jpg F.jpg R.jpg B.jpg U.jpg D.jpg eq_img.jpg

exit
The cube2sphericalpano transform order of LFRBUD (Left, Front, Right, Back, Up, and Down) is different than what is documented (3). The process took around 1 minute to complete.

Once done, the equirectagular image was created, but much of the details was lost because of a resolution was decrease. So to correct that, this command was used with the transform process to best match the source images along the horizon, 768 x 4 = 3072. The equirectangular image has a ratio of 2:1, so that is why 3072 x 1536 was defined. Here is the final script, which also draws a border around each cube map face.
#!/bin/bash
# cloudacm.com
# Adjustment to retain original resolution
# IM Batch Process - ImageMagick Script authored by Fred Weinhaus
# See site, https://www.fmwconcepts.com/imagemagick/cube2sphericalpano/index.php

# Crop the original 1024 x 768 to a 768 x 768 image, based off of calibration measurements of 768 px = 90 degrees
convert src_L.jpg -crop 768x768+128+0 mod_L.jpg
convert mod_L.jpg -bordercolor black -border 4x4  L.jpg
convert src_F.jpg -crop 768x768+128+0 mod_F.jpg
convert mod_F.jpg -bordercolor black -border 4x4  F.jpg
convert src_R.jpg -crop 768x768+128+0 mod_R.jpg
convert mod_R.jpg -bordercolor black -border 4x4  R.jpg
convert src_B.jpg -crop 768x768+128+0 mod_B.jpg
convert mod_B.jpg -bordercolor black -border 4x4  B.jpg
convert src_U.jpg -crop 768x768+128+0 mod_U.jpg
convert mod_U.jpg -bordercolor black -border 4x4  U.jpg
convert src_D.jpg -crop 768x768+128+0 mod_D.jpg
convert mod_D.jpg -bordercolor black -border 4x4  D.jpg
# Create Equirectangular image from source images
./cube2sphericalpano -d 3072x1536 L.jpg F.jpg R.jpg B.jpg U.jpg D.jpg eq_img.jpg

exit
The transform process took substantially longer to take, almost 7 minutes, with a high amount of resource utilization.
[sphere 4647]
Another method available to transform cube maps to equirectangular images is by using python. The cube2sphere transform process does have a dependency which requires blender (4). Once both are installed, the following script can be used. The entire process took 7.5 seconds to complete.
#!/bin/bash
# cloudacm.com
# Python Batch Process - cube2sphere
# See, https://pypi.org/project/cube2sphere/

# Crop the original 1024 x 768 to a 768 x 768 image, based off of calibration measurements of 768 px = 90 degrees
convert src_L.jpg -crop 768x768+128+0 mod_L.jpg
convert mod_L.jpg -bordercolor black -border 4x4  L.jpg
convert src_F.jpg -crop 768x768+128+0 mod_F.jpg
convert mod_F.jpg -bordercolor black -border 4x4  F.jpg
convert src_R.jpg -crop 768x768+128+0 mod_R.jpg
convert mod_R.jpg -bordercolor black -border 4x4  R.jpg
convert src_B.jpg -crop 768x768+128+0 mod_B.jpg
convert mod_B.jpg -bordercolor black -border 4x4  B.jpg
convert src_U.jpg -crop 768x768+128+0 mod_U.jpg
convert mod_U.jpg -bordercolor black -border 4x4  U.jpg
convert src_D.jpg -crop 768x768+128+0 mod_D.jpg
convert mod_D.jpg -bordercolor black -border 4x4  D.jpg
# Create Equirectangular image from source images
cube2sphere B.jpg F.jpg R.jpg L.jpg U.jpg D.jpg -r 3072 1536 -f JPEG -o PythonEquirectangular.jpg

exit
There is yet another transform process available to convert cube map faces into equirectangular images. This site provided insights into using FFMpeg as the transform engine (5). The process does require that the FFMpeg version support the v360 filter. Here is the script used with that process.
#!/bin/bash
# cloudacm.com
# FFMpeg Batch Process - v360 Filter Usage

# Crop the original 1024 x 768 to a 768 x 768 image, based off of calibration measurements of 768 px = 90 degrees
convert src_L.jpg -crop 768x768+128+0 mod_L.jpg
convert mod_L.jpg -bordercolor black -border 4x4  L.jpg
convert src_F.jpg -crop 768x768+128+0 mod_F.jpg
convert mod_F.jpg -bordercolor black -border 4x4  F.jpg
convert src_R.jpg -crop 768x768+128+0 mod_R.jpg
convert mod_R.jpg -bordercolor black -border 4x4  R.jpg
convert src_B.jpg -crop 768x768+128+0 mod_B.jpg
convert mod_B.jpg -bordercolor black -border 4x4  B.jpg
convert src_U.jpg -crop 768x768+128+0 mod_U.jpg
convert mod_U.jpg -bordercolor black -border 4x4  U.jpg
convert src_D.jpg -crop 768x768+128+0 mod_D.jpg
convert mod_D.jpg -bordercolor black -border 4x4  D.jpg
montage R.jpg L.jpg U.jpg D.jpg F.jpg B.jpg -tile 6x1 -geometry +0+0 montage_out.png
# Create equirect image from cubemap
ffmpeg -i montage_out.png -vf "v360=c6x1:e" equirectangular.png

exit
The process took 4 seconds to complete and kept the resolution intact. The time and resource savings is significant which positions this transform method as a viable option when processing multiple cub maps into video.
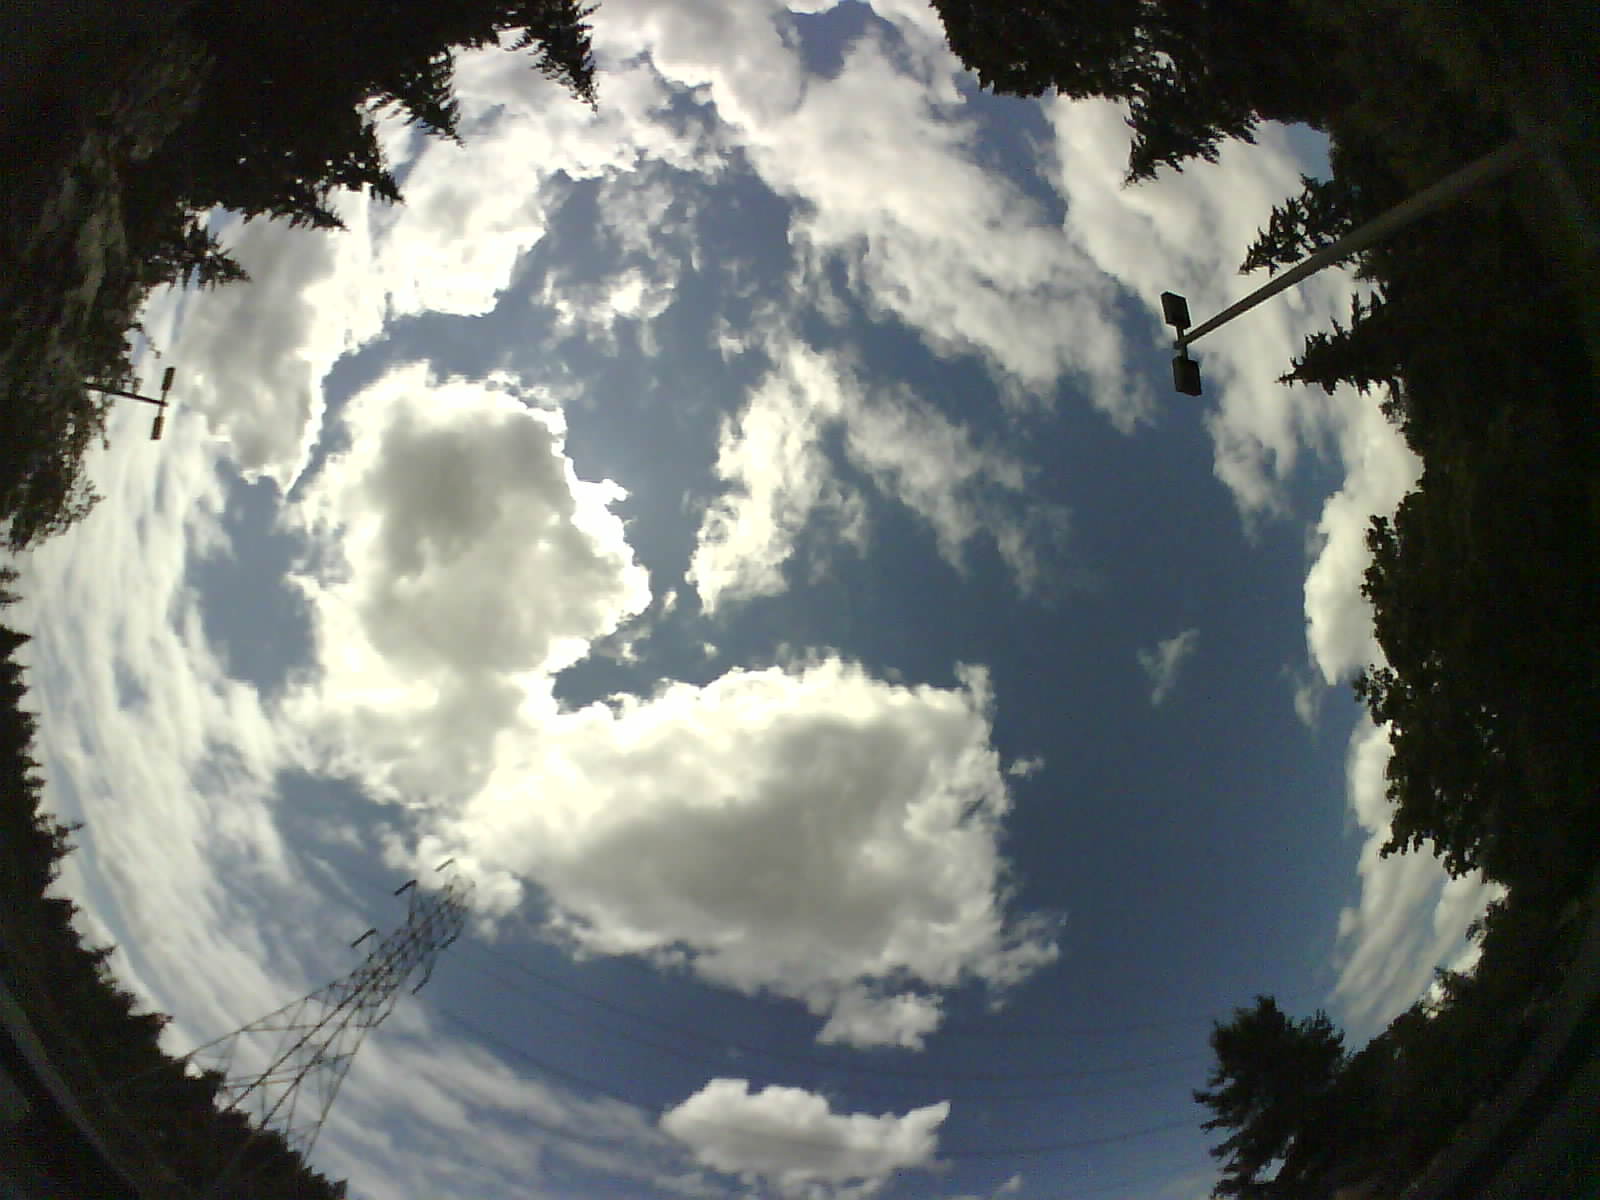
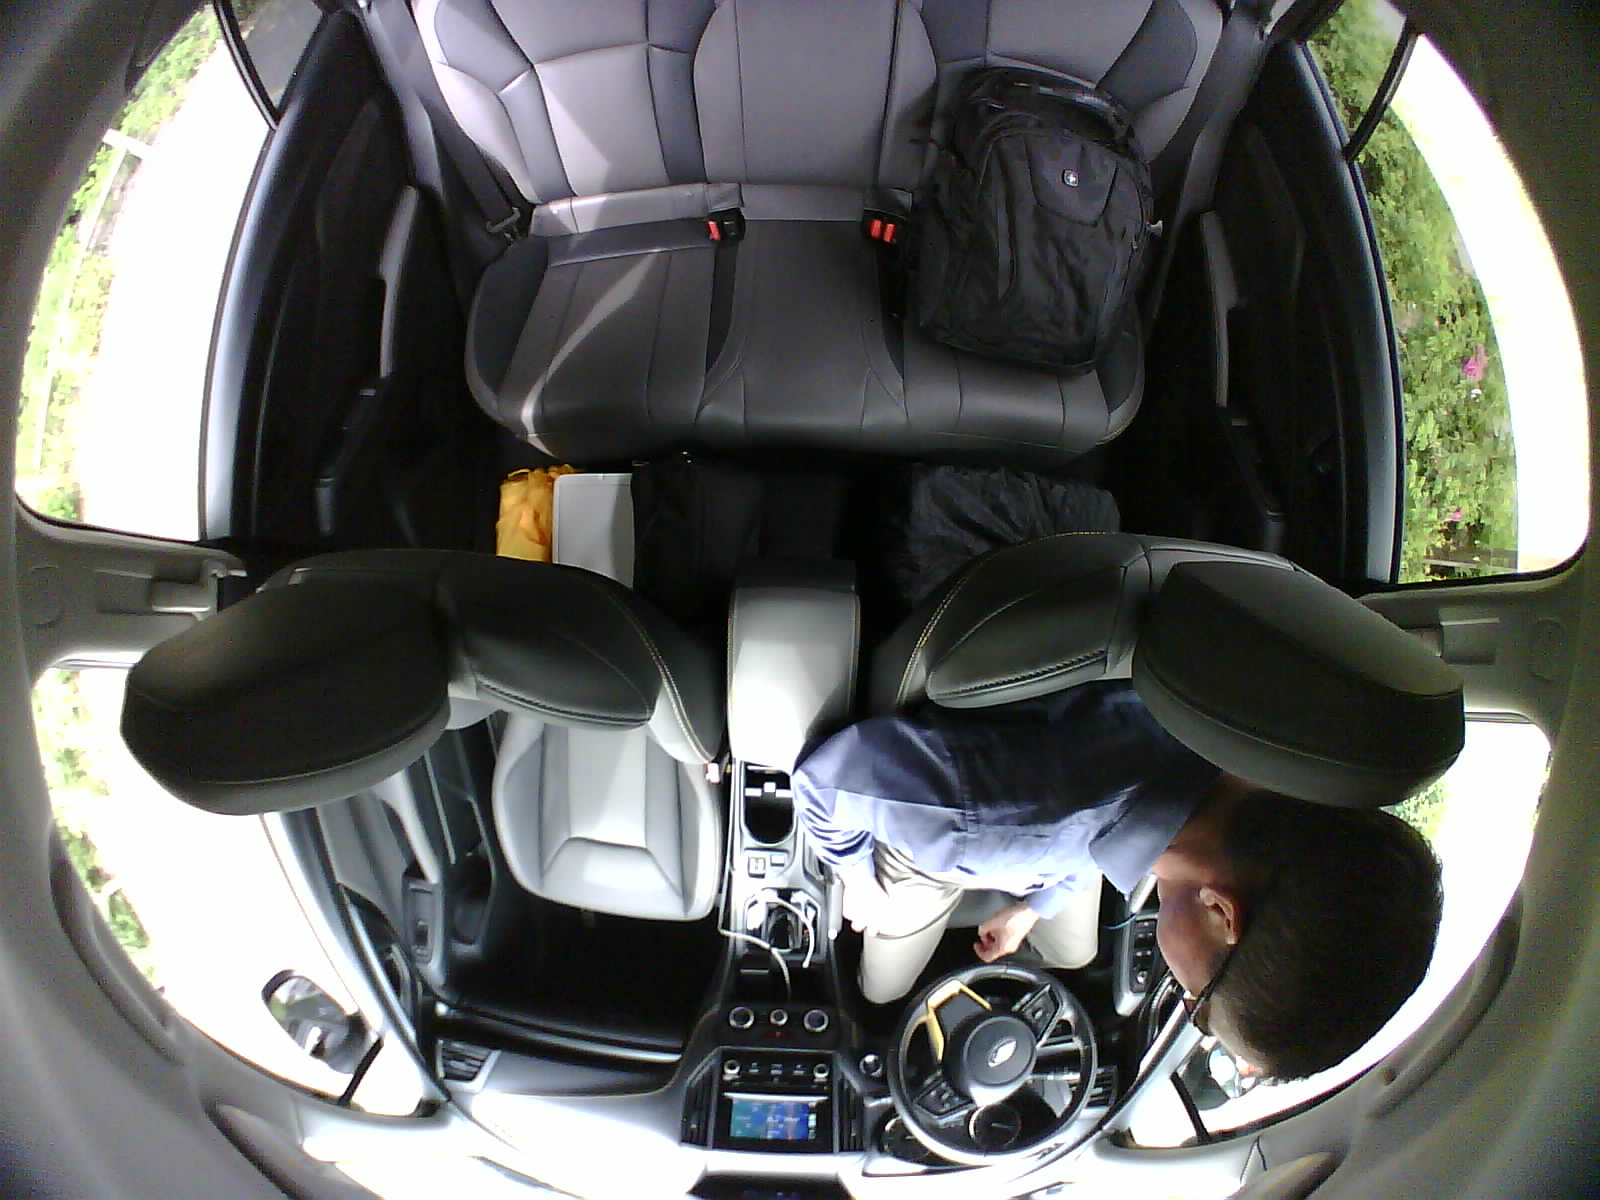
FFMpeg also can transform a single fisheye image into a half equirectangular image using a remap filter. The ESP32 Cam module OV2640 image sensors with a 200 degree field of view is needed. A search for “OV2640 200 degree” should show what is available. This lens type will have some blank regions due to the sensor aspect ratio limitation. Unlike the 6 images required from a cube map, this method only requires 2 images taken at polar opposition. Here are two source images that will be processed to create a complete equirectangular image. The dimensions of the images are 1600 x 1200 because FRAMESIZE_UXGA was defined in the ESP32 module code.
This script will remap the fisheye image for each hemisphere and montage the into a final equirectangular image.
#!/bin/bash
# cloudacm.com
# FFMpeg Batch Process - Fisheye Remap Filter Vertical Axis

# Create remapping files based off of maximum dimension of source.
# Modify geq='value/2-Y*(value/2)/value*sin(X*2*PI/value)' so that value = the intended max dimension, in this case 1600.
ffmpeg -f lavfi -i nullsrc=size=1600x1600 -vf format=pix_fmts=gray16,geq='1600/2-Y*(1600/2)/1600*sin(X*2*PI/1600)' -frames 1 -y xmap.pgm
ffmpeg -f lavfi -i nullsrc=size=1600x1600 -vf format=pix_fmts=gray16,geq='1600/2-Y*(1600/2)/1600*cos(X*2*PI/1600)' -frames 1 -y ymap.pgm

# Resize the image canvas to a square using the maximum dimension from the source, again 1600.
convert photo_0000009.jpg -gravity center -background black -extent 1600x1600  photo_0000009_out1.jpg
convert photo_0000208.jpg -gravity center -background black -extent 1600x1600  photo_0000208_out1.jpg

# Create the Remap PGM files.
ffmpeg -i photo_0000009_out1.jpg -i xmap.pgm -i ymap.pgm -q 0 -lavfi "format=pix_fmts=rgb24,remap" photo_0000009_out2.jpg
ffmpeg -i photo_0000208_out1.jpg -i xmap.pgm -i ymap.pgm -q 0 -lavfi "format=pix_fmts=rgb24,remap" photo_0000208_out2.jpg

# One of the source images was upside down, this rotates it.
convert photo_0000208_out2.jpg -distort SRT -180 photo_0000208_out3.jpg

# The images need to be resized to a 4:1 ratio.
ffmpeg -i photo_0000009_out2.jpg -vf "scale=6400:1600" photo_0000009_out4.jpg
ffmpeg -i photo_0000208_out3.jpg -vf "scale=6400:1600" photo_0000208_out4.jpg

# Both images are tiled together.
montage photo_0000009_out4.jpg photo_0000208_out4.jpg -tile 1x2 -geometry +0+0 montage_out1.jpg

# The image needs to be reduced in size due to some limitation for web use.
convert montage_out1.jpg -resize 2000x1000 final_out.jpg

exit
[sphere 4655]
If the fisheye image sources are pointed along the horizon, then the following script can be used to adjust for that pitch. This method was inspired from the Anders Jiras’s demo of animated yaw and pitch controls using the FFMpeg v360 filter (6).
#!/bin/bash
# cloudacm.com
# FFMpeg Batch Process - Fisheye Remap Filter Horizon Axis

# Create remapping files based off of maximum dimension of source, in this case 1600.
# Modify geq='value/2-Y*(value/2)/value*sin(X*2*PI/value)' so that value = the intended max dimension.
ffmpeg -f lavfi -i nullsrc=size=1600x1600 -vf format=pix_fmts=gray16,geq='1600/2-Y*(1600/2)/1600*sin(X*2*PI/1600)' -frames 1 -y xmap.pgm
ffmpeg -f lavfi -i nullsrc=size=1600x1600 -vf format=pix_fmts=gray16,geq='1600/2-Y*(1600/2)/1600*cos(X*2*PI/1600)' -frames 1 -y ymap.pgm

# Resize the image canvas to a square using the maximum dimension from the source, in this case 1600.
convert photo_0000006.jpg -gravity center -background black -extent 1600x1600  photo_0000006_out1.jpg
convert photo_0000007.jpg -gravity center -background black -extent 1600x1600  photo_0000007_out1.jpg

# Remap the images.
ffmpeg -i photo_0000006_out1.jpg -i xmap.pgm -i ymap.pgm -q 0 -lavfi "format=pix_fmts=rgb24,remap" photo_0000006_out2.jpg
ffmpeg -i photo_0000007_out1.jpg -i xmap.pgm -i ymap.pgm -q 0 -lavfi "format=pix_fmts=rgb24,remap" photo_0000007_out2.jpg

# One of the source images was upside down, this rotates it.
convert photo_0000007_out2.jpg -distort SRT -180 photo_0000007_out3.jpg

# The images need to be resized to a 4:1 ratio.
ffmpeg -i photo_0000006_out2.jpg -vf "scale=6400:1600" photo_0000006_out4.jpg
ffmpeg -i photo_0000007_out3.jpg -vf "scale=6400:1600" photo_0000007_out4.jpg

# Both images are tiled together.
montage photo_0000006_out4.jpg photo_0000007_out4.jpg -tile 1x2 -geometry +0+0 montage_out1.jpg

# The image needs to be reduced in size due to some limitation for web use, https://renderstuff.com/tools/360-panorama-web-viewer/
convert montage_out1.jpg -resize 2000x1000 final_out1.jpg

# The camaera is pointed to the horizon and this command pitches the projection 90 degrees from vertical to horizontal.
ffmpeg -i final_out1.jpg -vf v360=input=e:output=e:pitch="90":yaw="0" final_out2.jpg

exit
[sphere 4658]
There are so many more details about the FFMpeg v360 and remap filters, but they are far beyond the scope of this post. Below are sources for further reading on the subject. Suffice it to say, using a 4MP ESP32 Cam module array will not offer the same quality you would get from a 24MP Ricoh THETA V . But for the average cost of a Ricoh THETA V is over $300 at the time of this post. Compare that to two ESP32 Cam modules and the two OV2640 200 degree sensors which costs under $25, the price break might offset the lower 4MP quality, depending on the use application. Personally, I would finding hard to digest loosing a UAV with a Ricoh onboard.
Sources
(1) https://en.wikipedia.org/wiki/Cube_mapping
(2) https://www.fmwconcepts.com/imagemagick/sphericalpano2cube/index.php
(3) https://www.fmwconcepts.com/imagemagick/cube2sphericalpano/index.php
(4) https://pypi.org/project/cube2sphere/
(5) https://jiras.se/ffmpeg/index.html
(6) https://jiras.se/ffmpeg/v360_ball2.html
FFMpeg Book
https://www.astro-electronic.de/FFmpeg_Book.pdf
FFMpeg Remap Filter
https://trac.ffmpeg.org/wiki/RemapFilter
Pre-processing Garmin VIRB 360 recordings with FFmpeg
https://www.arj.no/2021/12/21/ffmpeg-v360-processing/
FFmpeg Cheat Sheet for 360 degree video
https://gist.github.com/nickkraakman/e351f3c917ab1991b7c9339e10578049
Equirectangular-remap
https://github.com/prouast/equirectangular-remap
Insta360-Air-remap
https://github.com/radbis/Insta360-Air-remap
ThetaS-video-remap
https://github.com/96fps/ThetaS-video-remap
Py360convert
https://github.com/sunset1995/py360convert
SphereSnap
https://pypi.org/project/sphere-snap/
Paul Bourke – Panorama (cylindrical and equirectangular) and 360 video
https://paulbourke.net/panorama/
Online Render Site
https://renderstuff.com/tools/360-panorama-web-viewer/
A Lightweight Panorama Viewer for the Web
https://pannellum.org/
OmniCV – A computer vision library for omnidirectional(360 degree) cameras
https://kaustubh-sadekar.github.io/OmniCV-Lib/index.html
Ricoh THETA V Plugin Application Development – Community Guide
https://theta360developers.github.io/plugin-guide/
Youtube – FFMPEG Conversion of Photos and Videos to Equirectangular – Gear 360 and Other
https://www.youtube.com/watch?v=70cXIemaNac